Category: Technology

Running Jupyter notebooks on Imperial College’s compute cluster

We were really glad to see James Howard (NHLI, Faculty of Medicine) announcing on Twitter that he’d published a Kaggle kernel to accompany his recent publication on MR image analysis for cardiac pacemaker identification using neural networks via PyTorch and torchvision. Sharing code in this way is a great way to promote open research, enable reproducibility and encourage re-use.

Figure 3 from Cardiac Rhythm Device Identification Using Neural Networks

We thought it might be helpful to explain how to run similar notebooks on Imperial’s cluster compute service, given that it can provide some benefits while you’re developing code:

  • Your code and data remain securely on-premise, thanks to the RCS Jupyter Service and Research Data Store
  • You can run parallel interactive and non-interactive jobs that span several days, across multiple GPUs

With James’ permission we’ve lightly modified his notebook and published it in an exemplar repository alongside some instructions to run it on the compute cluster. We hope this can help others to use a combination of Conda, Jupyter and PBS in order to conduct GPU-accelerated machine learning on infrastructure managed by the College’s Research Computing Service – without incurring any cost at the point of use.

Many thanks to James Howard for sharing his notebook and reviewing our instructions

Quilting with Julia, or how to combine parallelism and derived types for high performance computing

Research and quilting have a similar Zen in that both combine and build upon multiple prior works. But the workflow is difficult to reproduce in research software: how can we combine group X’s state-of-the-art ODE solver with group Z’s state-of-the-art parallel linear algebra to create Y’s new biology model when they all use different libraries and conventions? This is the problem that Julia tackles head on, thanks to it’s innovative type system and multiple dispatch. In “Shared Memory Parallelization of Banded Block-Banded Matrices” we describe how to combine the parallelization capabilities from one package (SharedArrays) with the specialized matrix  of another (BlockBandedMatrices.jl) – without modifying the internals of either.

This work follows on from a NumFOCUS sponsored collaboration at Imperial College between the Research Computing Service and Sheehan Olver in the Department of Mathematics.

Using the Cloud for Research Software Engineering

We previously described three RSE-related use cases for Microsoft’s Azure platform, ranging in deployment granularity from VMs to individual JavaScript functions. In this post we’ll explain further how we use those and other Azure services to complement our on-premise infrastructure – helping us to deliver our RSE projects faster.

At Imperial we’re fortunate to have a powerful and well-maintained high-performance computing (HPC) system. We use this as a batch processing back-end for user-facing web applications that we have developed (such as Smart Forming) and for benchmarking projects including MUSE. The web applications themselves are typically hosted on CentOS VMware virtual machines hosted in our data centre and maintained by a dedicated team within ICT. These servers are set up to authenticate against our institutional sign-on system, are pre-configured with monitoring and alerting, and can directly access other on-premise systems (such as the HPC cluster and our Research Data Store).

Despite this local infrastructure we still derive a lot of value from access to our institutional Azure subscription, in both ad hoc and longer-term use of cloud resources. This gives us capabilities that would be difficult or costly to replicate on-premise. These include:

  • The ability to rapidly provision and tear-down systems and services
  • Access to higher-level (lower-maintenance) abstractions i.e. PaaS and FaaS
  • Access to a diverse range of operating systems and configurations, from VMs for multiple versions of Windows to macOS build agents

In particular we rely on the following services:

  • DevOps Pipelines: Cross-platform QA (primarily testing and linting) and packaging (including PyInstaller builds on macOS and Windows). Build failures are pushed to relevant Teams channels.
  • Functions: Our Trending app provides us with information about active repositories in our institutional GitHub organisation. Using Functions makes its deployment zero-maintenance.
  • App Service: Our GtR app provides us with alerts for new UKRI grants to Imperial College. It is deployed to App Service to avoid the setup and maintenance required of a standalone VM.
  • Cosmos DB: Both GtR and Trending use the MongoDB API provided by Cosmos.
  • Virtual Machines: We use Azure when we need VMs for long-running services that are required to accept incoming requests from other systems but don’t need access to on-premise resources, or when we need short-lived VMs for testing purposes:
  • Container Registry: We use continuous deployment for all our web apps (including MAGDA and POWBAL), meaning that pushing to the master branch in GitHub is sufficient to run our QA pipeline, build a Docker image which is pushed to the Azure registry, and for Watchtower to pull the image onto the target server and restart the relevant service(s).
  • Single Sign-On: This allows users of our internal apps to authenticate using their existing Office 365 accounts – avoiding the need for further login details.
  • Notebooks: We have our own Jupyter server attached to our cluster and data store, but Azure Notebooks are very useful for sharing externally, and for teaching large classes.

In short, Azure provides us with services that work alongside our existing systems, enabling us to deliver RSE projects more effectively and with much lower operational overheads than if we tried to replicate the same features on-premise. And by becoming familiar with these services we’re better equipped to advise and assist researchers across Imperial College who wish to take advantage of all the compute resources at their disposal – on-premise and in the cloud.

Cloud-first: Serverless alerts for trending repositories

This is the third and final post in a series describing activities funded by our RSE Cloud Computing Award. We are exploring the use of selected Microsoft Azure services to accelerate the delivery of RSE projects via a cloud-first approach.

In our previous two posts we described two ways of deploying web applications to Azure: firstly using a Virtual Machine in place of an on-premise server, and then using the App Service to run a Docker container. The former provides a means of provisioning an arbitrary machine much more rapidly that would traditionally be possible, and the latter gives us a seamless route from development to production – greatly reducing the burden of long-term maintenance and monitoring.

By taking these steps we’ve reduced our unit of deployment from a VM to a container and simplified the provisioning process accordingly. However, building a container, even when automated, incurs an overhead in time and space and the resultant artifact is still one-step removed from our code. Can we do any better – perhaps by simply bundling our code and submitting to a suitable capable runtime – without needing to understand a technology such as Docker?

Azure Functions provide a “serverless” compute service that can run code on-demand (i.e. in response to a trigger) without having to explicitly provision infrastructure. There are similarities with the App Service in terms of ease of management, but also some differences: principally that in return for some loss of flexibility in runtime environment you get an even simpler deployment mechanism and potentially much lower usage charges. Your code can be executed in response to a range of events, including webhooks, database triggers, spreadsheet updates or file uploads.In this post we’ll demonstrate how to run deploy a simple scheduled task: a Node.js script that sends a periodic email identifying the most active repositories within a GitHub organisation. It uses the GitHub GraphQL API to get the the latest statistics (stars, forks and commits) and tracks the changes in a database. I use this script to receive weekly updates for trending repositories under ImperialCollegeLondon, but it’s easy to reconfigure for your own organisation.

As previously, we’ll use the Azure Cloud Shell, and arguments that you’ll want to set yourself are highlighted in bold.

Getting started

As usual we first create a resource group, and then add a storage account for our function:

az group create --name myResourceGroup --location westeurope
az storage account create --resource-group myResourceGroup --name ictrendingstore --sku Standard_LRS

Creating our function app

Then we create our app (a container for one or more functions):

az functionapp create --resource-group myResourceGroup --name ictrending --storage-account ictrendingstore --consumption-plan-location westeurope

And upgrade Node.js so that we can use ES6 features including async functions:

az functionapp config appsettings set --resource-group myResourceGroup --name ictrending --settings FUNCTIONS_EXTENSION_VERSION=beta WEBSITE_NODE_DEFAULT_VERSION=8.9.4

Deploying our code

Before we upload our code we configure the runtime with some required configuration (repository name, GitHub token, MongoDB URL and email settings):

az functionapp config appsettings set --resource-group myResourceGroup --name ictrending --settings GITHUB_ACCESS_TOKEN=xxx ORGANISATION=ImperialCollegeLondon MONGO_URL=mongodb://username:password@example.com/db SMTP_URL=smtp://username:password@example.com EMAIL_FROM=from@example.com EMAIL_TO=to@example.com

I’m using Azure’s MongoDB-compatible service (Cosmos DB) but there are many other hosting providers, including MongoDB themselves (Atlas).

We then simply upload a zipped copy of our code, its dependencies, and a trigger configuration (a timer for 8am on Mondays):

curl -LO https://github.com/ImperialCollegeLondon/trending/releases/download/v1.0.0/trending.zip
az functionapp deployment source config-zip ---resource-group myResourceGroup --name ictrending --src trending.zip

You’ll subsequently receive your weekly email on Monday morning, assuming there has been some activity in your chosen organisation!

Inspecting the code reveals that it needs to comply with a (very lightweight) calling convention by exporting a default function and invoking a callback on the provided context, and it needs to be written in one of several supported languages. We uploaded our source as an archive but you can also deploy (and then update) code directly from source control.

Tidying up

As usual you can delete your entire resource group, including your storage account and function by running:

az group delete --name myResourceGroup

Summary

In this post we’ve shown how zipping and uploading your source code can be sufficient to get an app into production. This is all without knowledge of any particular operating system or virtualisation technology, and at very low cost thanks to consumption-based charging and on-demand activation. Whether you choose to deliver your software as a VM, container or source archive will obviously depend on the nature of the application and its usage patterns, but this flexibility provides potentially great productivity gains – not only in deployment but also long-term maintenance. In this instance it’s a great fit for short-lived scheduled tasks but there any a huge number of alternative applications.

We’d like to thank Microsoft Azure for Research and the Software Sustainability Institute for their support of this project.

Cloud-first: Rapid webapp deployment using containers

This is the second in a series of posts describing activities funded by our RSE Cloud Computing Award. We are exploring the use of selected Microsoft Azure services to accelerate the delivery of RSE projects via a cloud-first approach.

In our previous post we described the deployment of a fairly typical web application to the cloud, using an Azure Virtual Machine in place of an on-premise server. Such VMs offer familiarity and a great deal of flexibility, but require initial provisioning followed by ongoing maintenance and monitoring. Our team at Imperial College is increasingly using containers to package applications and their dependencies, using Docker images as our unit of deployment. Can we do better than provisioning servers on a case-by-case basis to get web applications into production, and thereby more rapidly deliver services to our users?

The Azure App Service provides a solution named Web App for Containers, which essentially allows you to deploy a container directly without provisioning a VM. It handles updates to the underlying OS, load balancing and scaling. In this post we’ll demonstrate how to run pre-built and custom Docker images on Azure, without having to manually configure any OS or container runtime. As previously, we’ll use the Azure Cloud Shell, and arguments that you’ll want to set yourself are highlighted in bold.

Getting started

First of all we create an App Service plan. This only needs to be performed once for your active subscription:

az group create --name myResourceGroup --location "West Europe"
az appservice plan create --name myAppServicePlan --resource-group myResourceGroup --sku S1 --is-linux

Deploying a pre-built, public container image

It’s then just one command to run a Docker container. In this case we’ll deploy Nginx using its Docker Hub image:

az webapp create --resource-group myResourceGroup --plan myAppServicePlan --name ic-nginx --deployment-container-image-name nginx

We can then visit our public site at https://ic-nginx.azurewebsites.net/

You can use a custom DNS name by following these further instructions. Note that the site automatically has HTTPS enabled.

Decommissioning the webapp (thereby avoiding any further charges) is similarly straightforward:

az webapp delete --resource-group myResourceGroup --name ic-nginx

Deploying a custom container image

Running your own app is as simple as providing a valid container identifier to az webapp create.  This can point to either a public or private image on Docker Hub or any other container registry, including Azure’s native registry.

For demonstration purposes we’ll build a Datasette image to publish the UK responses from the 2017 RSE Survey. Datasette is a great tool for automatically converting an SQLite database to a public website, providing not only a means to browse and query the data (including query bookmarking) but also an API for programmatic access to the underyling data. It has a sister tool, csvs-to-sqlite, that takes CSV files and produces a suitable SQLite file.

First we need to install both tools, download the survey data, and convert it from CSV to SQLite:

pip install https://github.com/simonw/csvs-to-sqlite/zipball/master datasette
curl -O https://raw.githubusercontent.com/softwaresaved/international-survey/master/analysis/2017/uk/data/cleaned_data.csv
csvs-to-sqlite --table responses cleaned_data.csv uk-rse-survey-2017.db

Then we can create a Docker image containing the data and the Datasette app with one command, annotating with the appropriate licence information:

datasette package uk-rse-survey-2017.db
--tag mwoodbri/uk-rse-survey:2017
--title "UK RSE Survey (2017)"
--license "Attribution 2.5 UK: Scotland (CC BY 2.5 SCOTLAND)"
--license_url "https://creativecommons.org/licenses/by/2.5/scotland/deed.en_GB"
--source "The University of Edinburgh on behalf of the Software Sustainability Institute"
--source_url "https://github.com/softwaresaved/international-survey"

Then we push the image to Docker Hub:

docker push mwoodbri/uk-rse-survey:2017

And, as previously, create an Azure Web App:

az webapp create --resource-group myResourceGroup --plan myAppServicePlan --name rse-survey --deployment-container-image-name mwoodbri/uk-rse-survey:2017

Using Datasette

After a brief delay the app is publicly available: https://rse-survey.azurewebsites.net/

Note that the App Service automatically detects the right port to expose (8001 in this case) and maps it to port 80.

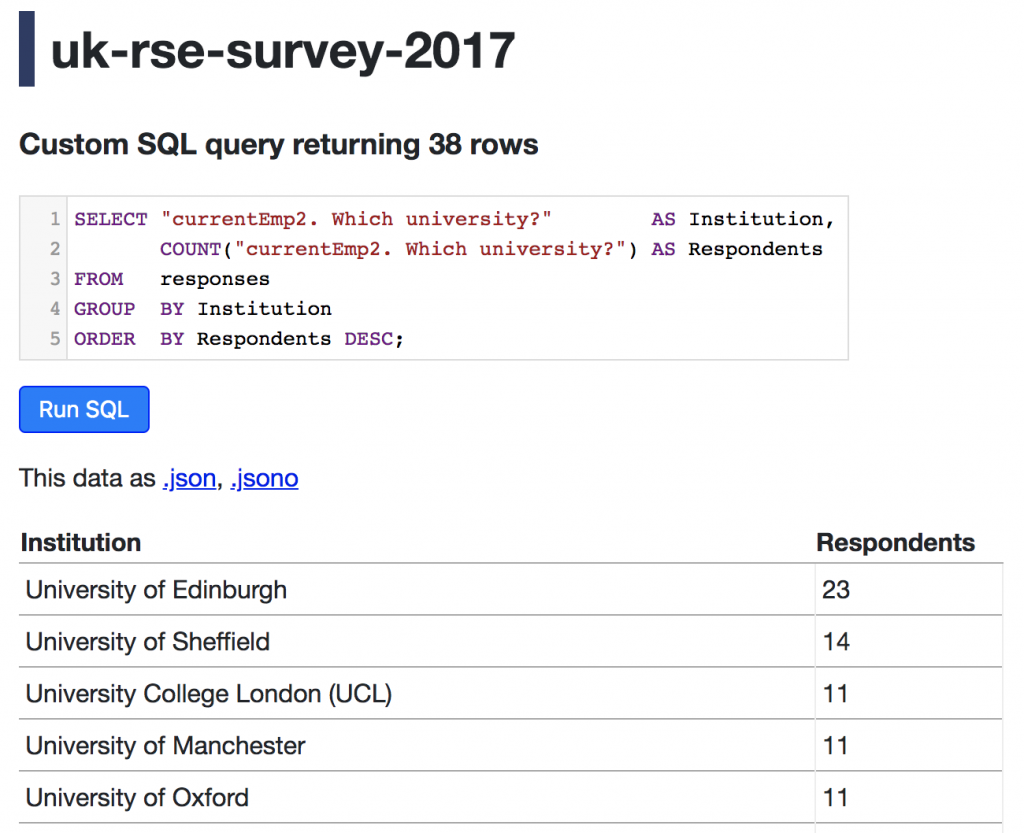
Datasette enables you to run and bookmark SQL queries, for example this query which lists the contributors’ organisations in order of the number of responses received:
Private registries

If you’re hosting your images on a publicly accessible that requires authentication then you can use the previous az webapp create command into two steps: one to create the app and then to assign the relevant image. In this case we’ll use the Azure Container Registry but this approach is compatible with any Docker Hub compatible registry.

First we’ll provision a container registry. These steps are unnecessary if you already have one:

az acr create --name myrepo --resource-group myResourceGroup --sku Basic --admin-enabled true
az acr credential show --name myrepo

Then we can login to our private registry and push our appropriately tagged image:

docker login myrepo.azurecr.io --username username

docker push myrepo.azurecr.io/uk-rse-survey:2017

Finally we can create our webapp and configure it to be created using the image from our private registry:

az webapp create --resource-group myResourceGroup --plan myAppServicePlan --name rse-survey
az webapp config container set --resource-group myResourceGroup --name rse-survey --docker-custom-image-name myrepo.azurecr.io/rse-survey --docker-registry-server-url https://myrepo.azurecr.io --docker-registry-server-user username --docker-registry-server-password password

The end result should be exactly the same as when using the same image but from the public registry.

Tidying up

As usual, you can delete your entire resource group, including your App Service plan, registry (if created) and webapps by running:

az group delete --name myResourceGroup

Summary

In this post we’ve demonstrated how a Docker image can be run on Azure using one command, and how to build an deploy a simple app that presents a simple interface to explore data provided in CSV format. We’ve also shown how to use images from private registries.

This approach is ideal for deploying self-contained apps, but doesn’t present an immediate solution for orchestrating more complex, multi-container applications. We’ll revisit this in a subsequent post.

Many thanks to the Software Sustainability Institute for curating and sharing the the RSE survey data (reused under CC BY 2.5 SCOTLAND) and Simon Willison for Datasette.

Cloud-first: Simple automated testing using Drone

This is the first in a series of posts describing activities funded by our RSE Cloud Computing Award. We are exploring the use of selected Microsoft Azure services to accelerate the delivery of RSE projects via a cloud-first approach.

A great way to explore an unfamiliar cloud platform is to deploy a familiar tool and compare the process with that used for an on-premise installation. In this case we’ll set up an open source continuous delivery system (Drone) to carry out automated testing of a simple Python project hosted on GitHub. Drone is not as capable or flexible as alternatives like Jenkins (which we’ll consider in a subsequent post) but it’s a lot simpler and a suitable example of a self-contained webapp for our purposes of getting started with Azure.

We’ll be automatically testing this repository, containing a trivial Python 3 project with a single test which can be run via python -m unittest.  We add a single YAML file to the repository to configure Drone accordingly.

There are then just three (short!) steps to get Drone testing the repository whenever code is pushed to GitHub. You don’t need anything except a web browser and an Azure account:

1: Create an Azure VM where we’ll install Drone

You can do this via the Azure Portal but we’ll use the new Azure Cloud Shell as it’s quicker – and easier to document, which is important for reproducibility. Drone is distributed as a Docker image so we’ll provision a minimal Container Linux VM to host it. We need to create a resource group, add the VM, give it a public DNS name (you will need to choose your own, instead of my-ci-server) and enable HTTP(S) access:

az group create -l westeurope --name my-rg
az vm create --name my-ci-server --resource-group my-rg --image CoreOS:CoreOS:Stable:1632.2.1 --generate-ssh-keys --size Basic_A0
az network public-ip update --name my-ci-serverPublicIP --resource-group my-rg --dns-name my-ci-server
az network nsg rule create --resource-group my-rg --nsg-name my-ci-serverNSG --name HTTP --destination-port-ranges 80 --priority 1010
az network nsg rule create --resource-group my-rg --nsg-name my-ci-serverNSG --name HTTPS --destination-port-ranges 443 --priority 1020

2: Register a new OAuth application in GitHub

In order to provide Drone with access to the repository (or repositories) we want to test, visit this page and enter the following, replacing the hostname appropriately:

  • Application name: Drone
  • Homepage URL: https://my-ci-server.westeurope.cloudapp.azure.com
  • Authorization callback URL: https://my-ci-server.westeurope.cloudapp.azure.com/authorize

Save the Client ID and Client Secret for the next step

3: Install and configure Drone

Run the following commands back in the Cloud Shell. You again need to replace the hostname, and also provide your GitHub username and the Client ID and Secret from the previous step.

ssh my-ci-server.westeurope.cloudapp.azure.com
sudo docker run -d --name drone-server -e DRONE_HOST=https://my-ci-server.westeurope.cloudapp.azure.com -e DRONE_ADMIN=mwoodbri -e DRONE_GITHUB=true -e DRONE_GITHUB_CLIENT=xxxxxxxxxxxxxxxxxxxx -e DRONE_GITHUB_SECRET=xxxxxxxxxxxxxxxxxxxxxxxxxxxxxxxxxxxxxxxx -e DRONE_LETS_ENCRYPT=true -v drone:/var/lib/drone/ -p 80:80 -p 443:443 --restart=unless-stopped drone/drone
sudo docker run -d --name drone-agent --link drone-server -e DRONE_SERVER=drone-server:9000 -v /var/run/docker.sock:/var/run/docker.sock --restart=unless-stopped drone/agent

Then visit https://my-ci-server.westeurope.cloudapp.azure.com and toggle the switch next to the name of the relevant repository.

Next steps

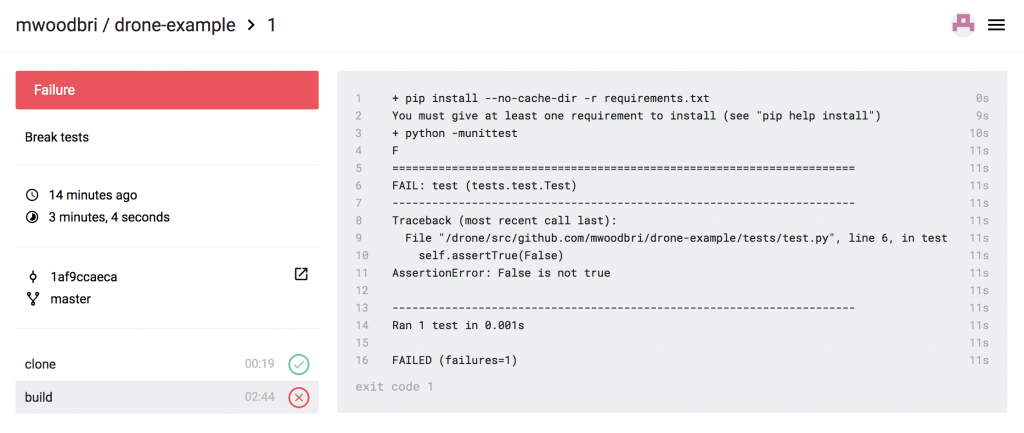
Drone is now monitoring the code for changes, and will run the test suite in response. If we deliberately break our unit test by making this change and pushing the code then Drone will immediately run the code and identify a problem:

It will also annotate the commit as bad and provide us with a badge that can be dynamically embedded in our README.md.

We can then go onto configure Drone to notify us via email, Slack etc of failures using one of its many plugins.

Summary

We’ve seen how various features of the Azure platform, including Virtual Machines, Cloud Shell, and the extensive Marketplace can be combined with GitHub and Drone to rapidly deploy a secure, private CI system entirely from your browser. There exist alternative means of achieving the same result – not least various hosted, subscription based systems – and there are Azure recipes for Jenkins and Drone itself. However, the approach demonstrated here is applicable to any container-based software and therefore provides a flexible and efficient means of at least prototyping new services – via a cloud-first strategy.